How to Make Ice Cream Without a Machine: A Simple, Sweet Guide
There’s something magical about homemade ice cream. Maybe it’s the way it softens at the edges, the way the vanilla scent fills the kitchen, or the thrill of turning simple ingredients into something sweet and satisfying. While ice cream machines make the process convenient, you don’t need one to create a batch of creamy, dreamy ice cream at home. In fact, making ice cream without a machine is surprisingly easy — and incredibly fun.
Whether you’re craving soft-serve-style scoops, classic homemade ice cream, or a frozen treat that’s somewhere in between, this guide will walk you through everything you need to know. With just a few ingredients, a little patience, and a freezer, you’ll be able to whip up your own ice cream anytime the mood strikes.
Why Make Ice Cream Without a Machine?
While ice cream machines are helpful, they’re not essential. Learning how to make ice cream by hand opens the door to creativity, flexibility, and nostalgia. It also makes the process more accessible — no extra equipment, no complicated settings, no waiting for a bowl to chill overnight. Just mix, freeze, and enjoy.
Here are a few reasons this method is worth trying:
1. It’s budget-friendly.
No machine means no expensive equipment or bulky storage.
2. It’s customizable.
You control the creaminess, flavor, sweetness, and mix-ins.
3. It’s kid-friendly and fun.
This method feels like a tiny science experiment — and everyone can get involved.
4. It works anywhere.
Dorms, apartments, family kitchens, picnics… all you need is a freezer.
As a result, making ice cream without a machine becomes far more than a recipe — it becomes an experience.
The Secret Behind No-Churn Ice Cream
Traditional ice cream relies on constant churning to incorporate air and prevent ice crystals. However, the no-churn method uses a simple trick: whipped cream + sweetened condensed milk. This combination builds structure, keeps the texture light, and creates that smooth, soft-serve-like consistency.
Soft serve fans will love it even more because no-churn ice cream naturally stays softer and creamier than traditional frozen recipes.
Ingredients You’ll Need
Here’s what you need to make a basic no-churn ice cream base:
- 2 cups heavy whipping cream
- 1 can (14 oz) sweetened condensed milk
- 1–2 teaspoons vanilla extract
- A pinch of salt
Optional Mix-ins
Add ½–1 cup of:
- Crushed cookies
- Brownie bites
- Fruit swirl
- Chocolate chips
- Peanut butter ribbons
- Caramel sauce
Even a small amount goes a long way in adding flavor and texture.
Tools You’ll Need
- Mixing bowl
- Electric mixer or whisk
- Spatula
- Loaf pan or freezer-safe container
- Plastic wrap
If you don’t have a mixer, you can whip cream by hand — it just takes a few extra minutes and a bit of elbow grease.
Step-by-Step: How to Make Ice Cream Without a Machine
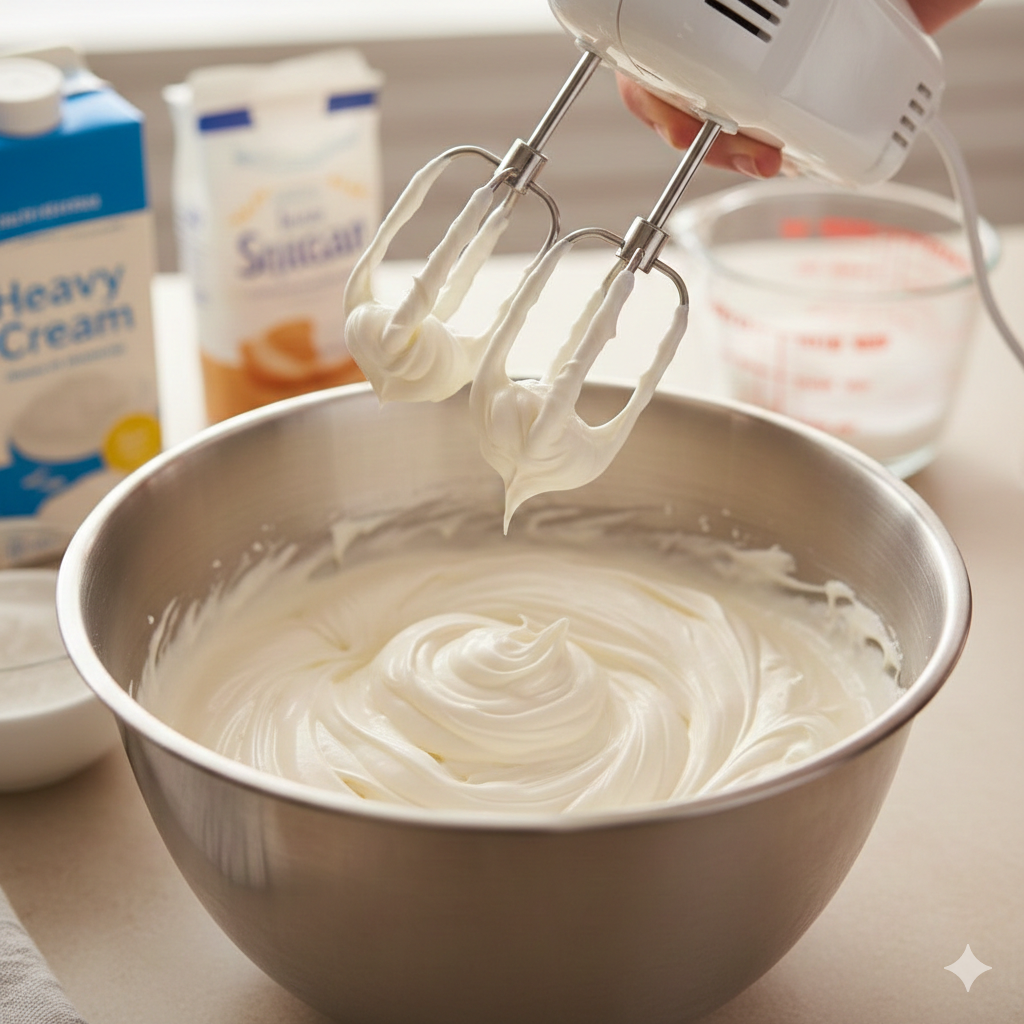
Step 1: Whip Your Cream
Start by whipping the heavy cream in a large bowl. Mix until soft, fluffy peaks form. While this usually takes only a few minutes with an electric mixer, it may take a little longer by hand. The key is to stop once the cream is firm enough to hold its shape but still smooth.
Step 2: Mix the Base
Next, pour the sweetened condensed milk into a separate bowl. Add the vanilla and salt, then stir until everything is well combined. This mixture is the foundation that gives no-churn ice cream its signature creamy texture.
Step 3: Fold Everything Together
Now comes the moment when everything comes together. Gently fold the whipped cream into the condensed milk mixture using a spatula. Try not to stir too aggressively — folding helps keep the air in the mixture, which creates that soft, scoopable consistency. Continue folding until the mixture looks smooth and evenly combined.
Step 4: Add Mix-ins
At this stage, gently stir in any toppings you’d like to include. For example, you can swirl in caramel, fold in cookie chunks, or add fruity stripes. This is where creativity shines.
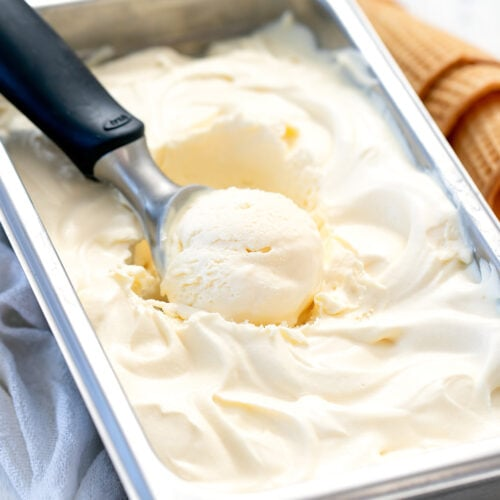
Step 5: Freeze the Ice Cream
Transfer your mixture to a loaf pan or freezer-safe container. Smooth the top and press a piece of plastic wrap directly against the surface. This helps prevent ice crystals from forming. Freeze the ice cream for at least 4–6 hours, or overnight for the best results.
When you’re ready to serve, scoop and enjoy immediately. Because no-churn ice cream freezes softly, it’s usually scoopable without needing extra time on the counter — another bonus of this method.
Tips for Perfect No-Machine Ice Cream
To help your ice cream turn out smooth, creamy, and flavorful, keep these tips in mind:
Use cold ingredients.
Cold cream whips faster and holds more air.
Fold, don’t stir.
Folding keeps the ice cream light and soft.
Avoid over-mixing.
Once combined, stop — too much stirring deflates the mixture.
Add bold flavors.
Since no-churn ice cream is naturally sweet, strong flavors like espresso, citrus zest, cocoa powder, and peanut butter work especially well.
Keep it covered.
Pressing plastic wrap onto the surface prevents frost and keeps your ice cream ultra-creamy.
Flavor Ideas to Try
If you’re ready to get creative, here are some fun combinations to experiment with:
• Cookies & Cream: Crushed Oreos folded in
• Strawberry Swirl: Fresh jam added in ribbons
• Mocha Chip: Espresso powder + chocolate chunks
• Birthday Cake: Sprinkles + vanilla extract
• Peanut Butter Cup: Peanut butter swirls + chocolate chips
Each of these variations uses the same base and takes only minutes to assemble.

Looking for more flavor inspiration?
Check out “10 Unique Homemade Flavor Ideas” —>
Trouble-scooping? What to Do If…
Your ice cream is too icy:
It may not have been mixed enough or may have been left uncovered in the freezer.
Your texture feels too soft:
Freeze it longer or reduce the amount of mix-ins.
It tastes too sweet:
Add a splash of heavy cream, a bit of cocoa powder, or tangy fruit to balance the sweetness.
Why This Method Works
No-churn ice cream relies on two things: air and fat. The whipped cream brings air into the mixture, while the condensed milk keeps ice crystals from forming. As a result, the final texture is rich, soft, and decadent — similar to soft serve but with the flavor of classic homemade ice cream.
This technique has become popular because it works for nearly every flavor combination. It’s also consistent, simple, and accessible for beginners.
Conclusion: A Sweet Treat Made Simple
Making ice cream without a machine is one of the easiest — and most satisfying — kitchen projects you can try. With only a few basic ingredients, a little mixing, and a freezer, you can create a dessert that tastes like it came from your favorite ice cream shop. More importantly, the process invites creativity, encourages experimentation, and brings people together.
If you’re ready to take your ice cream to the next level, check out my guide on how to make homemade waffle cones — they’re easier than you think and pair beautifully with any ice cream you make. –> Homemade Waffle Cones: A Simple Step by Step Guide
So next time a craving hits, you won’t need a machine — just a bowl, a whisk, and your imagination.
Try It & Share Your Scoop!
Give this recipe a try and share your scoop with us! Post your homemade ice cream and tag @TheCreameryBlog with #ShareYourScoop — I’d love to see what you create!
Tried the Recipe? What did you think?
Send us a message and let us know what worked or didn’t work to help us better our recipes.